

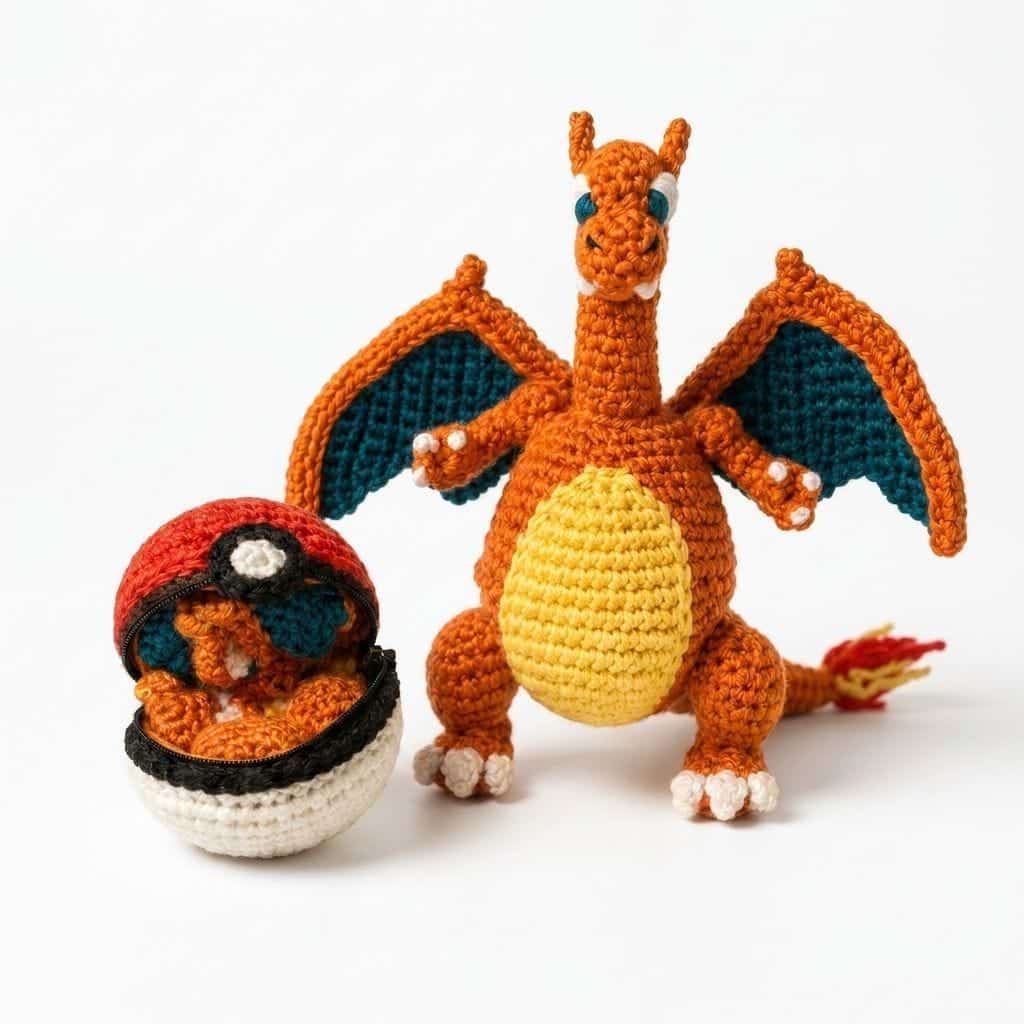
There’s a very specific kind of nostalgia in remembering the first time you saw a fire dragon on a cartoon screen and thought, “I need that in my life, immediately.” Decades later, that same craving is why the amigurumi dragon pattern below has become one of our most requested designs – except this one comes with a twist nobody saw coming: the dragon doesn’t just sit on your shelf, it hides inside a ball until you’re ready to let it out.
This guide walks through everything you need to crochet a fire dragon amigurumi from scratch, including the exact yarn weights and hook sizes we use, how long to budget for it, where beginners typically get stuck, and how our reversible “ball-to-dragon” construction actually works. If you’ve ever wanted to combine dragon energy with genuine “how did they DO that” craftsmanship, keep reading.
Why a fire dragon amigurumi pattern hits different
Dragons are the dream project for a lot of makers because they let you combine several skills in one plushie – shaping a body, adding wings, working spikes or horns, and choosing a fiery colorway that pops on a shelf. Our version leans hard into “fire dragon” energy: warm orange and red tones, a rounded believable dragon body, and a design silhouette that’s clearly inspired by the fan-favorite fire-type dragon from a certain beloved monster-collecting game (you know the one – we won’t name it directly, since this is an independent, unofficial, fan-made design and not an official product).
What makes this amigurumi dragon pattern different from a typical dragon plushie tutorial is the construction: instead of crocheting a dragon and separately crocheting a ball to display it in, the entire thing is built from one continuous piece of yarn. Flip it one way, it’s a smooth red-and-white sphere. Flip it inside out, and the fire dragon emerges, wings and all. It’s the same reversible technique that made our reversible Poké Ball crochet pattern a bestseller, scaled up to a more advanced silhouette.
Materials, yarn weight, and hook size
Getting gauge right matters more on a dragon than on a simple round plushie, because the wings and tail need to hold their shape without flopping. Here’s what we recommend:
- Yarn weight: Worsted weight (US #4 / Aran), acrylic or cotton-acrylic blend. Acrylic holds its shape well for wings and spikes; a cotton blend gives slightly crisper stitch definition if you want the scales to read clearly.
- Colors: At minimum, orange (main body), red or dark red (accents, ball exterior), cream or white (belly and ball accent), and black (eyes, if not using safety eyes).
- Hook size: A 3.25mm (US D/3) or 3.5mm (US E/4) hook. Sizing down from the yarn label’s suggested hook keeps your fabric dense enough that stuffing doesn’t peek through at the wing joints or tail tip, which is where gaps show up most.
- Stuffing: Polyester fiberfill, added in small amounts as you go rather than crammed in at the end – especially important in a reversible design where the stuffing has to behave through the flip.
- Extras: Safety eyes (9-10mm works well at this scale), a yarn needle, stitch markers (non-negotiable for this project), and optionally a bit of wire or pipe cleaner for wing structure if you want extra posability.
Difficulty level and time estimate
We’d rate this pattern as advanced beginner to intermediate – not because any single stitch is hard, but because the reversible construction asks you to think about the project in two directions at once. If you’ve already finished a straightforward round amigurumi (a ball, an octopus, a simple round animal) and understand magic rings and basic increases/decreases, you’re ready for this one.
Budget 6-10 hours total for a first attempt, usually spread across a few sittings. The body and ball shell are relatively quick (a few hours), but the wings, spikes, and the transition rounds where the ball “becomes” the dragon are where most of that time goes. Give yourself permission to work on it over a weekend rather than trying to finish it in one sitting – reversible construction rewards patience far more than speed.
How the reversible ball-to-dragon construction works
The core idea sounds like a magic trick, but it comes down to smart engineering with your stitches:
- You start at the “seam” between the two forms. Rather than crocheting a ball and a dragon separately, both are built from the same set of foundation stitches, worked outward in opposite directions.
- The ball side is worked with tighter, uniform rounds to create that smooth red-and-white sphere look, while the dragon side incorporates the increases and shaping that build the head, wings, and tail.
- A clever join point (rather than a seam) lets the whole piece invert, tucking one side’s stuffing and stitches inward while the other pops outward – similar in spirit to how a reversible knit hat is worked, just adapted for amigurumi in the round.
- Stuffing is distributed to support both states, which is the part beginners most often get wrong on their first reversible project (more on that below).
If this is your first reversible piece, we genuinely recommend starting with the smaller, simpler reversible Poké Ball pattern first. It teaches the flip mechanism at a smaller, faster scale before you commit to a dragon with wings and spikes added into the mix.
Common beginner mistakes on dragon (and reversible) amigurumi
- Overstuffing one side before working the reversible join. If you pack the ball side too firmly before you’ve worked the transition rounds, the flip either won’t invert cleanly or will distort the sphere shape. Stuff conservatively until you’ve completed the join, then adjust.
- Wings that flop instead of standing up. This usually means the increase rounds were worked too loosely. Go down a hook size, or work an extra round of single crochet along the wing edge to stiffen it.
- Losing track of which “side” you’re on mid-project. Use a locking stitch marker in a bright, contrasting color to mark the dragon-facing side versus the ball-facing side while you work – it sounds excessive until you’ve accidentally worked three rounds on the wrong side.
- Skipping gauge swatching. Because this pattern depends on both forms fitting together, a gauge that’s even slightly off can mean the ball doesn’t close neatly or the dragon looks stretched. A quick 4-round test swatch saves real heartache.
- Forgetting the magic ring foundation. Every round shape in this project starts from one. If you’re not confident with it yet, practice the magic ring technique on a scrap piece before starting the real project – it makes a visible difference in how tidy your center looks on both the ball and the dragon head.
No-sew tips for a cleaner finish
One of the best things about a well-designed amigurumi dragon pattern is that it can be worked with minimal seaming if you’re strategic about it:
- Work wings and horns directly onto the body in continuous rounds where possible, rather than crocheting them flat and sewing them on afterward.
- Use an invisible decrease (working through the front loops only of your last two stitches before pulling through) instead of a standard decrease – it all but eliminates the small gap or bump that a regular decrease leaves at the top of the head or the wing tips.
- When you do need to join a piece (like a horn or spike), join with a slip stitch and immediately weave the tail through several stitches on the inside rather than knotting it, which keeps the surface completely smooth.
- Steam-block the wings lightly before final assembly – it helps them hold a slight curve instead of lying flat, which reads much more dragon-like.
A note on inspiration and originality
To be fully transparent: this fire dragon amigurumi is an independent, unofficial, fan-made design inspired by the iconic orange fire-breathing dragon from a well-loved video game and card franchise – most people will immediately think of Charizard when they see the finished piece, and that’s very much the intended homage. It is not an officially licensed product, and our patterns are original crochet designs created by our own designer (known on Ravelry as The Nerd Gremlin), written for personal use and gift-making. We love this corner of monster-collecting fandom as much as you probably do, which is exactly why we design for it.
Where this fits in a bigger collection
If the fire dragon is your gateway into reversible amigurumi, you’ll likely enjoy exploring the rest of our Pokémon-inspired amigurumi collection, which includes the original reversible Poké Ball alongside other monster-inspired designs, plus a mini pattern bundle if you want to build out a whole shelf of smaller companions between bigger projects like this one.
FAQ
Is this amigurumi dragon pattern good for a first-time crocheter?
It’s better suited to an advanced beginner or intermediate maker who has already completed at least one round amigurumi project and is comfortable with magic rings, increases, and decreases. If you’re brand new to crochet, start with a simpler round shape first.
What yarn weight and hook size work best for an amigurumi dragon?
Worsted weight (US #4/Aran) yarn with a 3.25mm-3.5mm (US D/3 to E/4) hook gives the dense fabric needed to hold wing and spike shapes without stuffing showing through the stitches.
How does the ball-to-dragon reversible pattern actually flip?
The piece is built from one continuous piece of yarn with both the ball exterior and the dragon shaping worked outward from a shared foundation, so the whole thing can be turned inside out to switch between a smooth ball and the fully-shaped dragon – no separate pieces, no seams to hide.
Ready to crochet your own fire dragon?
If you’ve been waiting for a project that feels a little like performing a magic trick with yarn, this is it. Grab your worsted weight orange and red, size down to a 3.5mm hook, and give yourself an unhurried weekend. Explore the full Sage and Silky pattern library or head straight to the shop to get the fire dragon pattern (and its reversible Poké Ball sibling) in your hands today.
Ready to hide a dragon inside a ball? Try a reversible pattern next 🧶
Our signature Poké Ball patterns flip inside-out into the character — two toys in one, no sewing. Beginners finish them every day.
Shop Pokémon-inspired patterns → Get the 62-in-1 mini bundle ($9.99) →
