

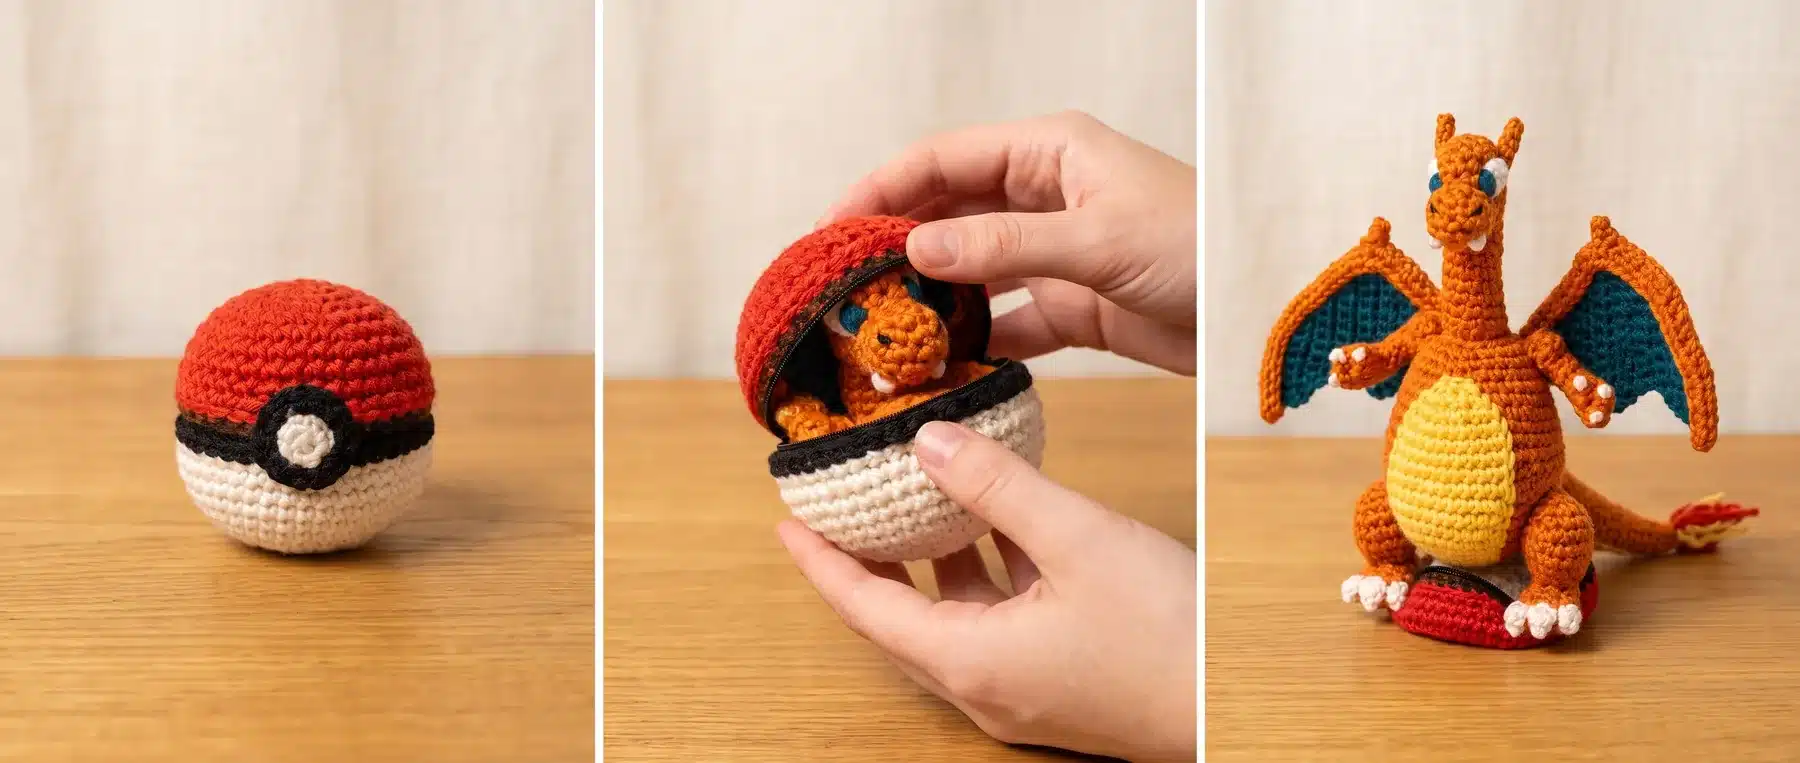
Every millennial remembers the exact sound effect of a Poké Ball opening – that little chime, the flash of light, the creature materializing out of thin air. It’s one of those weirdly specific pieces of nostalgia that never quite fades, which is exactly why our Poké Ball crochet pattern has become the design we’re best known for. This isn’t a plushie ball that sits next to a separate plushie creature. It’s one continuous piece of yarn that physically flips inside-out, transforming from a tidy red-and-white ball into a fully-formed Pokémon-inspired amigurumi.
If you’ve been searching for a Poké Ball crochet pattern that does something more interesting than “crochet two hemispheres and glue on a button,” this guide covers exactly how the reversible flip works, what yarn and hook size to use, how long to budget, and the mistakes that trip up nearly everyone on their first attempt.
What makes a reversible Poké Ball crochet pattern different
Most Poké Ball crochet patterns you’ll find online are essentially amigurumi spheres – two color-blocked halves joined together with a button or embroidered “click” detail in the middle. They’re cute, but they’re static. Ours is built differently from the ground up: the ball and the creature share the same foundation of stitches, worked as a single unbroken piece of yarn from start to finish.
That means there’s no separate small plushie tucked inside the ball, and no zipper or hidden pouch doing the trick. The ball’s inside surface IS the creature’s outside surface. When you turn it inside out, the tidy red-and-white sphere disappears and a Pokémon-inspired plushie – Pikachu, Charmander, or whichever creature you’ve chosen – takes its place. It’s the kind of “wait, how does that work?” reaction that makes this pattern our most-gifted design, and it started with our very first version, the reversible Charmander-inspired Poké Ball pattern.
Yarn weight, hook size, and materials
Because this pattern needs to look clean and hold shape in two completely different configurations, gauge consistency matters more here than in a typical amigurumi. Here’s what we recommend:
- Yarn weight: Worsted weight (US #4 / Aran). It’s substantial enough to hide the internal structure when flipped, but not so thick that the transformation rounds get bulky or hard to turn.
- Yarn fiber: Acrylic is the most forgiving choice for beginners and holds a crisp red/white contrast well. A cotton-acrylic blend gives slightly sharper stitch definition if you want an ultra-clean ball surface.
- Hook size: 3.25mm-3.5mm (US D/3 to E/4). Sizing down from what the yarn label suggests keeps your fabric tight, which is essential here – a looser gauge makes the flip mechanism visible from the outside, which ruins the “magic trick” effect.
- Colors: Red and white for the ball exterior, plus whichever colors your chosen Pokémon-inspired creature needs (for example, orange and cream for a Charmander-style design).
- Notions: Safety eyes, polyester fiberfill, a yarn needle, and several stitch markers – you’ll want more than usual to track the transition rounds.
Difficulty level and how long it takes
We rate this as a confident beginner to intermediate project. If you’ve completed one or two straightforward round amigurumi shapes and are comfortable with magic rings, single crochet, and basic increases and decreases, you have the foundation you need. The part that’s genuinely new – even for experienced crocheters – is thinking through the reversible construction logic, which is more of a “aha” moment than a technically difficult stitch.
Plan for 4-7 hours total on a first attempt. Compared to a standard round amigurumi of similar size, add roughly 30-50% more time for the transition rounds and for getting comfortable with the actual flip – the first time through, you’ll likely turn it right-side-out and inside-out a few extra times just to understand how the stitches behave.
Step-by-step: how the flip works
Here’s the general logic behind the transformation, broken into stages:
- Foundation round. You begin with a magic ring, exactly as you would for any round amigurumi. This becomes the shared starting point for both the ball and the creature.
- Diverging construction. From the foundation, the pattern works outward in a way that builds two compatible “shells” – one shaped to sit smoothly as a sphere, the other shaped with the increases needed for a head, ears, or other features.
- The transition band. This is the cleverest part of the pattern – a set of rounds designed so the fabric can invert without puckering or leaving a visible seam on either side. This is also where careful stuffing placement matters most.
- Closing and finishing. Once both “states” are complete, the piece is closed so that it holds its shape whichever way it’s turned, with stuffing distributed to support the sphere shape in one state and the creature’s features in the other.
- The flip itself. With practice, you can turn the finished piece from ball to creature in just a few seconds – it becomes second nature quickly, even though it looks complicated from the outside.
If you want to see this exact technique already written out stitch-by-stitch, our Charmander-inspired reversible Poké Ball pattern is the original and still the most beginner-friendly version to start with before moving on to other creatures in the line.
Common beginner mistakes on a reversible Poké Ball pattern
- Stuffing too early or too firmly. If you pack fiberfill in tightly before completing the transition rounds, the flip either jams or distorts the ball’s roundness. Stuff lightly in stages, and do a test flip before adding your final stuffing.
- Inconsistent tension between the ball rounds and the creature rounds. Because both sides share the same yarn, a tension shift partway through is very visible once flipped. Try to crochet the whole piece in one or two sittings rather than spreading it across many days, so your hand tension stays consistent.
- Mixing up front loops and back loops during the transition band. This is the single most common error – the transition rounds often require working into a specific loop to create the fold line that allows the reversal. Use a stitch marker to flag exactly where you are the first time through.
- Rushing the first flip. Turning the piece inside out for the first time can feel counterintuitive, almost like you’re about to ruin your work. Go slowly, work from the opening outward, and don’t force any section that feels stuck – a gentle push from the inside almost always resolves it.
- Using a hook that’s too large. A looser gauge makes the internal structure show through when flipped, and it also makes the fabric less sturdy for repeated flipping over time. Size down rather than up.
No-sew tips for a seamless reversible pattern
Because a reversible design shows both “faces” of your fabric, seams matter twice as much here as on a typical amigurumi:
- Work in continuous rounds wherever the pattern allows, rather than joining each round with a slip stitch – it prevents a visible seam line from appearing on the ball’s exterior.
- Use invisible decreases at the top of the head and around the ball’s closure point so there’s no visible gap or pucker in either state.
- Weave in ends as you go, immediately after each color change, rather than leaving them all for the end – with a reversible piece, a stray tail can end up visible on the “wrong” side after flipping.
- If your pattern calls for a button or contrast circle at the ball’s center, attach it with a nearly invisible stitch through just the surface fibers rather than a full running stitch, so it doesn’t show as a bump from the creature side.
A quick note on Pokémon-inspired design
To be upfront: this Poké Ball crochet pattern is an independent, unofficial, fan-made design inspired by the iconic capture device from a beloved video game and animated franchise. It isn’t an officially licensed product – it’s an original crochet pattern created by our designer (known in the Ravelry community as The Nerd Gremlin), sold for personal crafting and gift-making by makers who grew up loving the same games and shows we did. If you’re new to the whole reversible concept, this is the pattern most people start with, and it’s what led us to build out an entire Pokémon-inspired amigurumi collection around the same idea.
Where to go next
Once you’ve got the reversible flip down, you can apply the same core logic to other creatures in our line, or scale up to something more ambitious like our fire dragon design. If you’d rather build a whole collection of smaller companions between bigger reversible projects, our mini amigurumi pattern bundle is a great way to fill in the gaps. And if you’re still shaky on the very first step of any amigurumi project, it’s worth reviewing our guide on how to crochet a magic ring before diving in.
FAQ
How does a reversible Poké Ball crochet pattern actually flip inside out?
It’s worked as one continuous piece of yarn from a shared foundation round, with the ball exterior and the creature’s shaping built to be compatible with each other through a set of transition rounds – turning the finished piece inside out switches which “shell” faces outward.
What yarn and hook size are best for a Poké Ball crochet pattern?
Worsted weight (US #4/Aran) yarn with a 3.25mm-3.5mm (US D/3 to E/4) hook gives the tight, clean gauge needed so the internal structure doesn’t show through once the piece is flipped.
Is the reversible Poké Ball pattern good for beginners?
It’s best suited to a confident beginner who has already finished at least one simple round amigurumi and knows magic rings, increases, and decreases – the stitches themselves aren’t advanced, but the reversible construction logic is new even for experienced makers.
Ready to make the ball that isn’t just a ball?
There’s something genuinely delightful about handing someone what looks like a simple crocheted ball and watching their face when it turns into a creature in their hands. If that’s the reaction you’re chasing, grab the original reversible Poké Ball pattern, browse the growing Pokémon-inspired collection, or head over to the full Sage and Silky shop to find your first (or next) reversible project.
Loved this Poké Ball breakdown? Try a reversible pattern next 🧶
Our signature Poké Ball patterns flip inside-out into the character — two toys in one, no sewing. Beginners finish them every day.
Shop Pokémon-inspired patterns → Get the 62-in-1 mini bundle ($9.99) →
